bluehost

Wednesday, 27 September 2023

Making Of Multiplication Table ;Python.

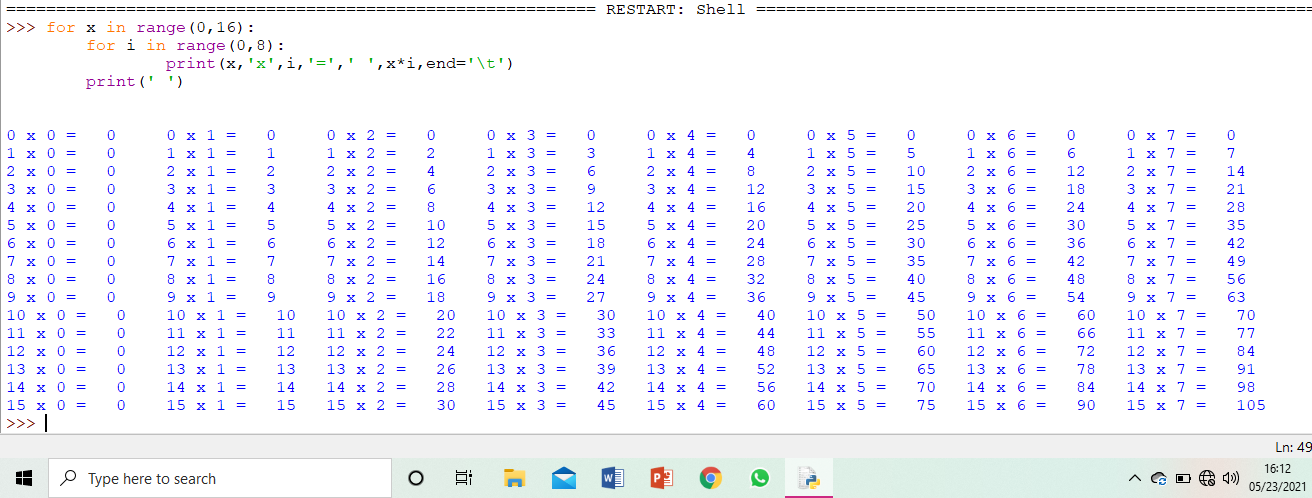
Today I want to share with you a short python project. A multiplication table python project. The is one of the shortest projects I have ever created. It contains less than five lines of code, but at the end of the coding, you get one of the best multiplication tables.

Codes.
As you can see, we have used four lines of code. With these four lines, you can adjust the codes inside and produce a better multiplication table of any length.

Inline one, for x in range (0,16) means we want our table to show multiplication of from zero to fifteen .since the counting in python starts from zero, we end up getting a table of from zero to fifteen. The last number is never counted.

If you want to produce a table of up to a higher number, you can replace 16 with any bigger number like 17,18,19,20, etc.

For I in range(0,8) means we want to multiply each number in x with zero to eight.  you can also adjust your table by replacing 8 with any bigger 
After using just four lines of codes, you end up getting an amazing multiplication table like this.
You can use the above codes and see if you can get a better table than this.

WordPress vs Blogger: Key differences


Maybe you are asking yourself why you should have a blog. I'm here to tell you that many people have taken blogging as their full-time employment(career) and they are making very huge money from it.

As for now, there are very many blogging sites where bloggers can create their blogs and get the best services from them, but I'm going to take you through just two; Blogger and WordPress.
Note: In this article, we are only talking about WordPress.org but not WordPress.com. you can also learn about their differences in this blog.

WordPress is a full content management system which means you can create a website using it. WordPress is not entirely free because you have to pay for a hosting plan in any hosting site of your choice. If you are looking for a cheap hosting site, look for Namecheap.com. If you want a better hosting company do it on Bluehost.com.

Blogger is beginner-friendly. It is very easy to create and publish your posts. All you need is to create a user profile using a google account. Then, you need to choose your URL which will have a .blogspot.com added to the end o your URL, for example, johnkey.blogspot.com. You can always change the domain ending by buying a custom domain.

After creating your account, you will get into the blogger dashboard where you can set up your blog, create posts, pages, and many more blog settings.

Pros and cons of WordPress.
1. The platform is beginner-friendly and easy to learn especially if you want to perform simple tasks like blogging.
2. There are many customized options in form of plugins and themes enabling you to design your site the way you want.
3. You are responsible for your site's management and making sure it's very secure.
4. You will need some money to invest when starting up your WordPress account like buying a domain name.

Pros and cons of the blogger.
1. It's very simple and quick to get started with a blogger. It takes very few minutes to create your blog and start running it.
2. Blogger is 100% free because you don't need any hosting plan like buying a domain and hosting it.
3. The platform is very basic because you can't do much with it. Many blog features are highly restricted.
4.Your blogger contents are not fully owned by you although you can export the contents to another site or blog.
.


Saturday, 24 June 2023

Adding a Dark Mode to Your Website: Enhancing User Experience with Ease

photo    courtesy


Introduction:

In the contemporary digital environment, incorporating a dark mode feature into your website can significantly enhance the user experience. Dark mode creates a visually appealing and relaxing browsing environment, lessening eye fatigue and enhancing comprehension. This article delves into the process of incorporating a dark mode into your online presence, providing insights and useful suggestions to ensure the smooth introduction of this desired function.

photo  Google


HTML process of adding dark mode:

<!DOCTYPE html>
<html lang="en" class="light-mode">
<head>
<link rel="stylesheet" type="text/css" href="dark.css">
</head>
<body>
<!-- Page content -->
<span id="dark-mode-icon"></span>

<button id="dark-mode-toggle">Toggle Dark Mode</button>
<script src="dark.js"></script>
</body>
</html>

4. Implementing Dark Mode with CSS:

The CSS techniques used to implement dark mode effectively. Utilize media queries to detect user preferences, or provide a manual toggle option for users to switch between light and dark modes. Walk through the necessary CSS modifications for background colours, text colours, and other relevant elements.

.light-mode {
/* Light mode styles */
Colour: #000;
background-color: #fff;
}
.dark-mode {
/* Dark mode styles */
color: #fff;
background-color: #333;
}
/* Additional styles for elements in dark mode */
.dark-mode h1 {
color: #fff;
}
@media (prefers-color-scheme: dark) {
/* Styles for automatic dark mode */
html:not(.dark-mode) {
color: #fff;
background-color: #333;
}
/* Additional styles for elements in automatic dark mode */
html:not(.dark-mode) h1 {
color: #fff;
}
}
body {
/* Other body styles */
transition: background-color 0.3s ease, color 0.3s ease;
}
#dark-mode-icon {
width: 24px;
height: 24px;
background-image: url('dark.png');
background-size: cover;
/* Add other styling as needed */
}

5. The JavaScript part of dark mode:

document.addEventListener('DOMContentLoaded', () => {
const darkModeToggle = document.getElementById('dark-mode-toggle');
const html = document.querySelector('html');
const localStorageKey = 'darkMode';
// Retrieve user preference from local storage
const isDarkModeEnabled = JSON.parse(localStorage.getItem(localStorageKey));
// Apply the appropriate class based on the user's preference
if (isDarkModeEnabled) {
html.classList.add('dark-mode');
} else {
html.classList.remove('dark-mode');
}
darkModeToggle.addEventListener('click', () => {
// Toggle dark mode class
html.classList.toggle('dark-mode');
// Save user preference to local storage
localStorage.setItem(localStorageKey, html.classList.contains('dark-mode'));
});
});


Conclusion:

By incorporating a dark mode feature into your website, you can significantly enhance the user experience by providing a visually appealing, comfortable, and customizable browsing experience. Follow the steps outlined in this article, adapting them to suit your website's specific requirements. Embrace the benefits of dark mode and empower users with an immersive and enjoyable interface. Implementing dark mode can be a game-changer in providing an exceptional user experience while keeping your website up to date with modern design trends.

Saturday, 10 June 2023

Why You Shoudl Learn Web Development In Python In 2023:15 Compelling Reasons

                                                    photo Canvas


In this post, we are going to explore 13 real-world examples of python in web development, giving examples of well known websites to innovative applications. You will see how python can power diverse and dynamic web projects, and you will learn some tips and tricks along the way.

13 real word examples of python in web development

1    Googleuses python for web crawling, search engine, Gmail, YouTube, and more.

2    Facebook:  

 Which is a big company, uses Python to do things like studying data, making search engines better, and managing their computers.

3    NASA:    NASA (National Aeronautics and Space Administration) which is a state-owned agency of the United
photo Google

 States of America in control of Civil space program using advanced research in aerospace and aeronautics. Python is a computer program that is used for science, processing data, and making things look real.

4    Netflix:    utilizes Python for the majority of its applications, which encompass data analysis, back-end web development, security automation, risk classification, vulnerability analysis, content recommendation analysis, machine learning, and numerous other related tasks.

5    Amazon:    Amazon uses Boto3, a Python-based AWS software development kit, to handle Amazon Elastic Compute Cloud (EC2), Amazon Simple Storage Services (S3), and Amazon DynamoDB.

6    Uber: Python is widely used by Uber for geolocation purposes, mathematical calculations, data management, and creating login functions.

With these, few discussions other big names which use python are;
7    Wikipedia
8    Instagram
9    Pinterest
10    Quora
11    Dropbox
12    Spotify
13    Reddit

Conclusion

Why are they using python?
Why do they utilize Python? Python is a flexible language that possesses great capabilities for various web-related endeavours. This includes constructing websites, creating programs, and offering services, with Python's repository of frameworks, libraries, and tools.

                                                photo courtesy inexturer.com

 It also benefits from having a wide and engaged community that actively aids in its growth and advancements. This article examines 13 examples depicting the practical applications of Python in web development, highlighting different challenges and use cases.

We hope you have learned something new with us and gained some inspiration for your own projects.
Fell free to comment, like, or give feedback. If you have enjoyed this post, don't forget to share with your friends, colleagues. Thanks for reading!


Tuesday, 24 May 2022

How To Make a Smooth Grid Layout Using CSS.

CSS can be used together with HTML to give a good HTML Website and other features. 

CSS is used to style HTML codes and make them attractive.

Without CSS, HTML website together with other programs like apps would be o no attraction at all.
CSS and HTML go hand in hand, and without one , the other would be of no much use.

In this article, I'm going to show you how to create attractive, and smooth user grid using both CSS and HTML.
Below are the codes of HTML register;
<body id="body">
<div id="container" class="container">
<h2>Register here</h2>
<div class="logo" ></div><br><br>

<div class="fields">
<input class="email" type="email" class="email-input" placeholder="Enter Email" ><br>
<input class="username" type="text" class="user-input" placeholder="Enter Username"><br>
<input class="password" type="password" class="pass-input" placeholder="Enter Password"><br>

<input class="password" type="password" class=" pass-input" placeholder="Confirm Password"><br>

<button type="button">Register</button>
</div>

<p>Already have an Account? <span id="login"><a href="index.html" style="color:#fb2525;">Login Here</a></span></p>

</div>


<script>

</script>
</body>
 

  sign in codes;
<body id="body">
<div class="container">
<h2>Login here</h2>
<div class="logo" ></div><br>
<div class="fields">
<input class="username" type="text" class="user-input" placeholder="Enter username"><br>
<input class="password" type="password" class="pass-input" placeholder="Enter password"><br><br>
<button type="button">Login</button>
</div>
<p id="forgot" onclick="Forgot()" >Fogort Password?</p>
<p>Create New Account <span id="register" > <a href="register.html" style="color:#fb2525;"> Here</a></span></p>

</div>


<script>
function Forgot() {
console.log('clicked');
}
</script>
</body>


Below are the codes of CSS;
#body{
margin:0;
padding:0;
background:#cbced1;
background-size: cover;
background-position:center;
font-family: sans-serif;
}
.container{
width: 350px;
height: 450px;
position: absolute;
left: 40%;
top: 2%;
color: #24cea9;
text-align: center;
padding: 60px 35px 35px 35px;
border-radius: 40px;
background: #ecf0f3;
box-shadow: 13px 13px 20px #7e878f,
-13px -13px 20px #e6dede;

}

#container{
width: 350px;
height: 550px;
position: absolute;
left: 40%;
top: 2%;
color: #24cea9;
text-align: center;
padding: 60px 35px 35px 35px;
border-radius: 40px;
background: #ecf0f3;
box-shadow: 13px 13px 20px #7e878f,
-13px -13px 20px #e6dede;
}

.logo{
background: url("bloh.jpg") no-repeat;
width: 70px;
height: 70px;
background-size: 100% 100%;
/* background-color: #fd7213; */
border-radius: 50%;
top: 30%;

margin: auto;
box-shadow: 0px 0px 2px #5f5f5f,
0px 0px 0px 5px #517691,
8px 8px 15px #5f5f5f,
-8px -8px 15px #ffff;
}

.fields{
width: 100%;
padding: 5px 5px 5px 5px;
}
.fields input{
border:none;
outline: none;
background: none;
font-size: 18px;
color: #555;
padding: 20px 40px 20px 35px;
}

.username, .password, .email{
margin-bottom: 10px;
border-radius: 25px;
box-shadow: inset 8px 8px 6px #cbced1,
inset -8px -8px 6px #ffffff;

}


button{
background: #24cea9;
border-radius: 30px;
outline: none;
cursor: pointer;
border: none;
width: 250px;
height: 60px;
font-size:14px;
font-style:normal;
font-weight: bold;
text-align: center;
font-family: 'lato', sans-serif;
color: #fff;
border: none;
box-shadow: inset 3px 3px 4px #49caf6,
inset -3px -3px 3px #ffffff;
/* transition: 0.5s; */
}

button:hover{
background-color: #49caf6;
}
p{
font-size: 14px;

}


You can add more features and make your grind look more attractive.

React vs Angular; Front-End Web Development

Angular and React  are two of the most popular Javascript tools for front-end development. React is a Javascript created by Meta...